
Filling & Capping Instructions
Follow these steps to ensure consistent fills, proper seals, and zero leaks across all Finished Goods vape hardware.
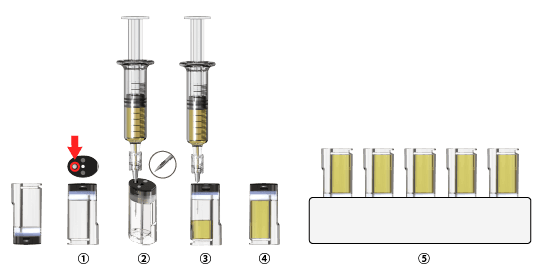
Pod system fill sequence, steps 1 to 5.
Needle & Setup
Invert the pod (fill hole up) and insert an 18-gauge or smaller side-hole needle through the fill hole.
Pierce the silicone to a depth of at least 15mm and keep the needle vertical throughout filling.
Filling
WARNING: Do not pierce the same fill hole twice. This increases leakage risk.
Do not overfill. Fill to 98% capacity. Overfilling will cause leakage.
Temperature
WARNING: Do not heat most oils above 125°F (52°C) during filling. High THC percentage oil may require hotter filling temperatures. Please consult Finished Goods if your oil does not run through your filling system at 125 degrees or less.
Post-Fill
Keep the pod mouthpiece down for 30 minutes to 1 hour after filling. Different viscosity oils require different cooling times. This releases internal pressure and allows the oil to return to room temperature.
Do not package until this step is complete.
Packaging
Once oil has returned to room temperature, flip the pod fill hole down and proceed with packaging.
If the pod will be stored for multiple months, let it saturate for two to three days fill hole down, and then flip it, fill hole up, for long-term storage.
Before Smoking
Leave the pod fill hole down for 2-3 days before use to allow the room temperature oil to saturate the atomizer.
Thicker formulas may require more time.
Need Help With Your Fill Process?
Our team consults 1-on-1 with every customer on filling parameters, equipment compatibility, and atomizer selection.